目录
Web的三员大将——HTML、CSS、JavaScript,HTML负责架构,CSS负责视觉效果,而JavaScript则是负责逻辑交互,各司其职,使得Web简易上手,各种UI组件库如雨后春笋。 QT则背靠C++,坐拥其得力干将QML,QML以其简洁的语法和强大的UI设计能力,使得QT在GUI框架中炙手可热。当QT的性能融合Web的UI组件,会有怎么样的效果呢?
环境说明:
C++: Apple clang version 15.0.0
QT: v6.5
Nodejs: v22.5
npm: v10.8.2
Vue cil: @vue/cli 5.0.8
需要的环境有qt,C++编译器,nodejs,npm,vue/cli,Qt Creator 和 VS Code
QT融合HTML
创建QT项目
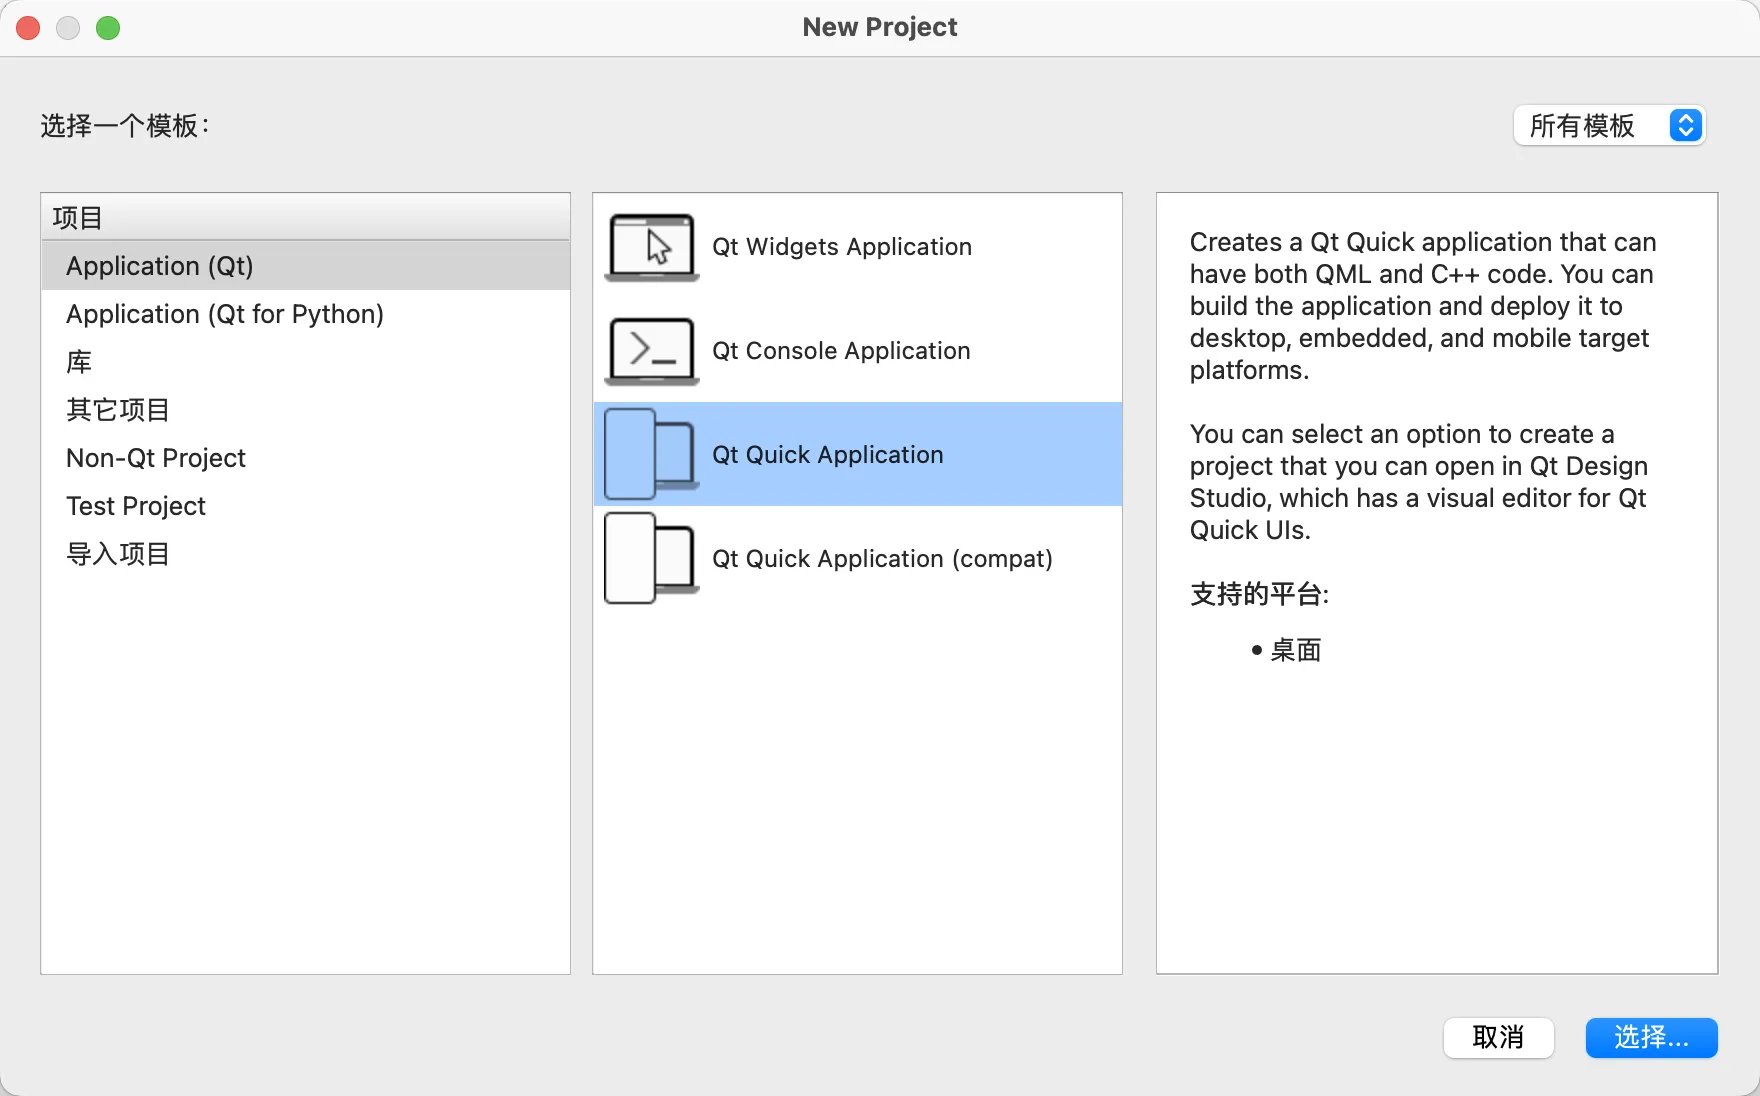
1.创建QT项目,打开Qt Creator,选择'Qt Quick application'
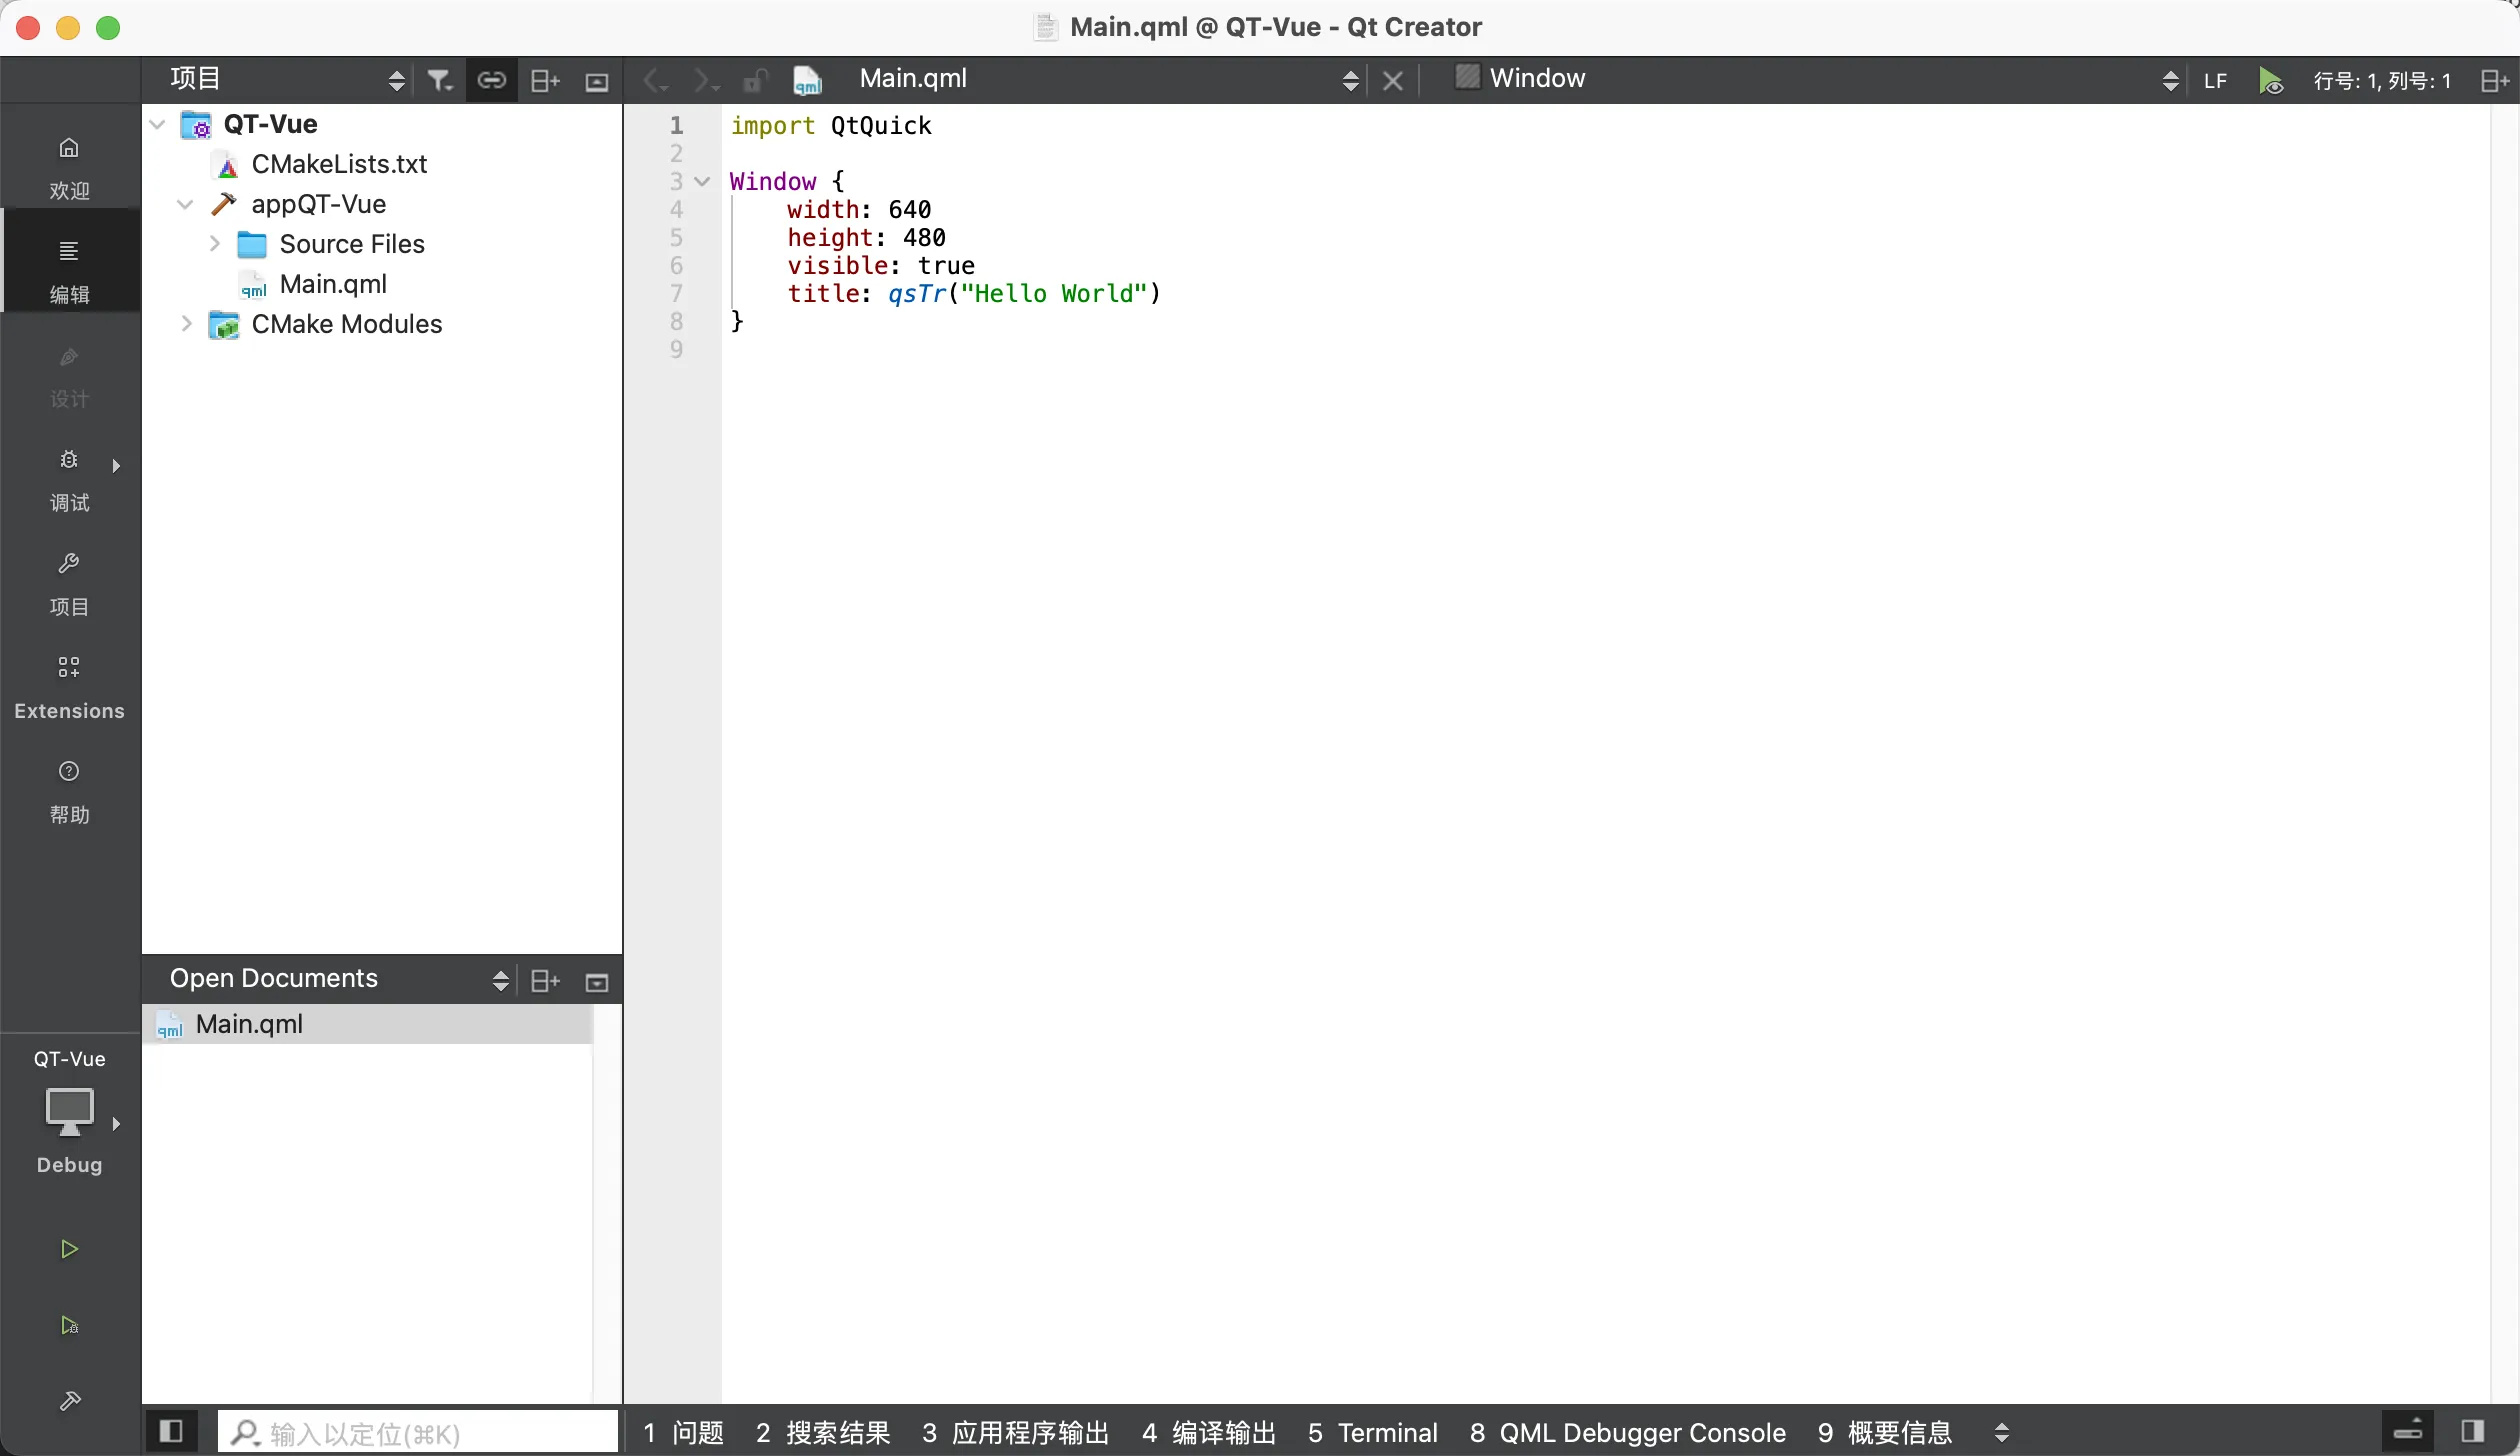
创建完项目之后将会得到以下结构:
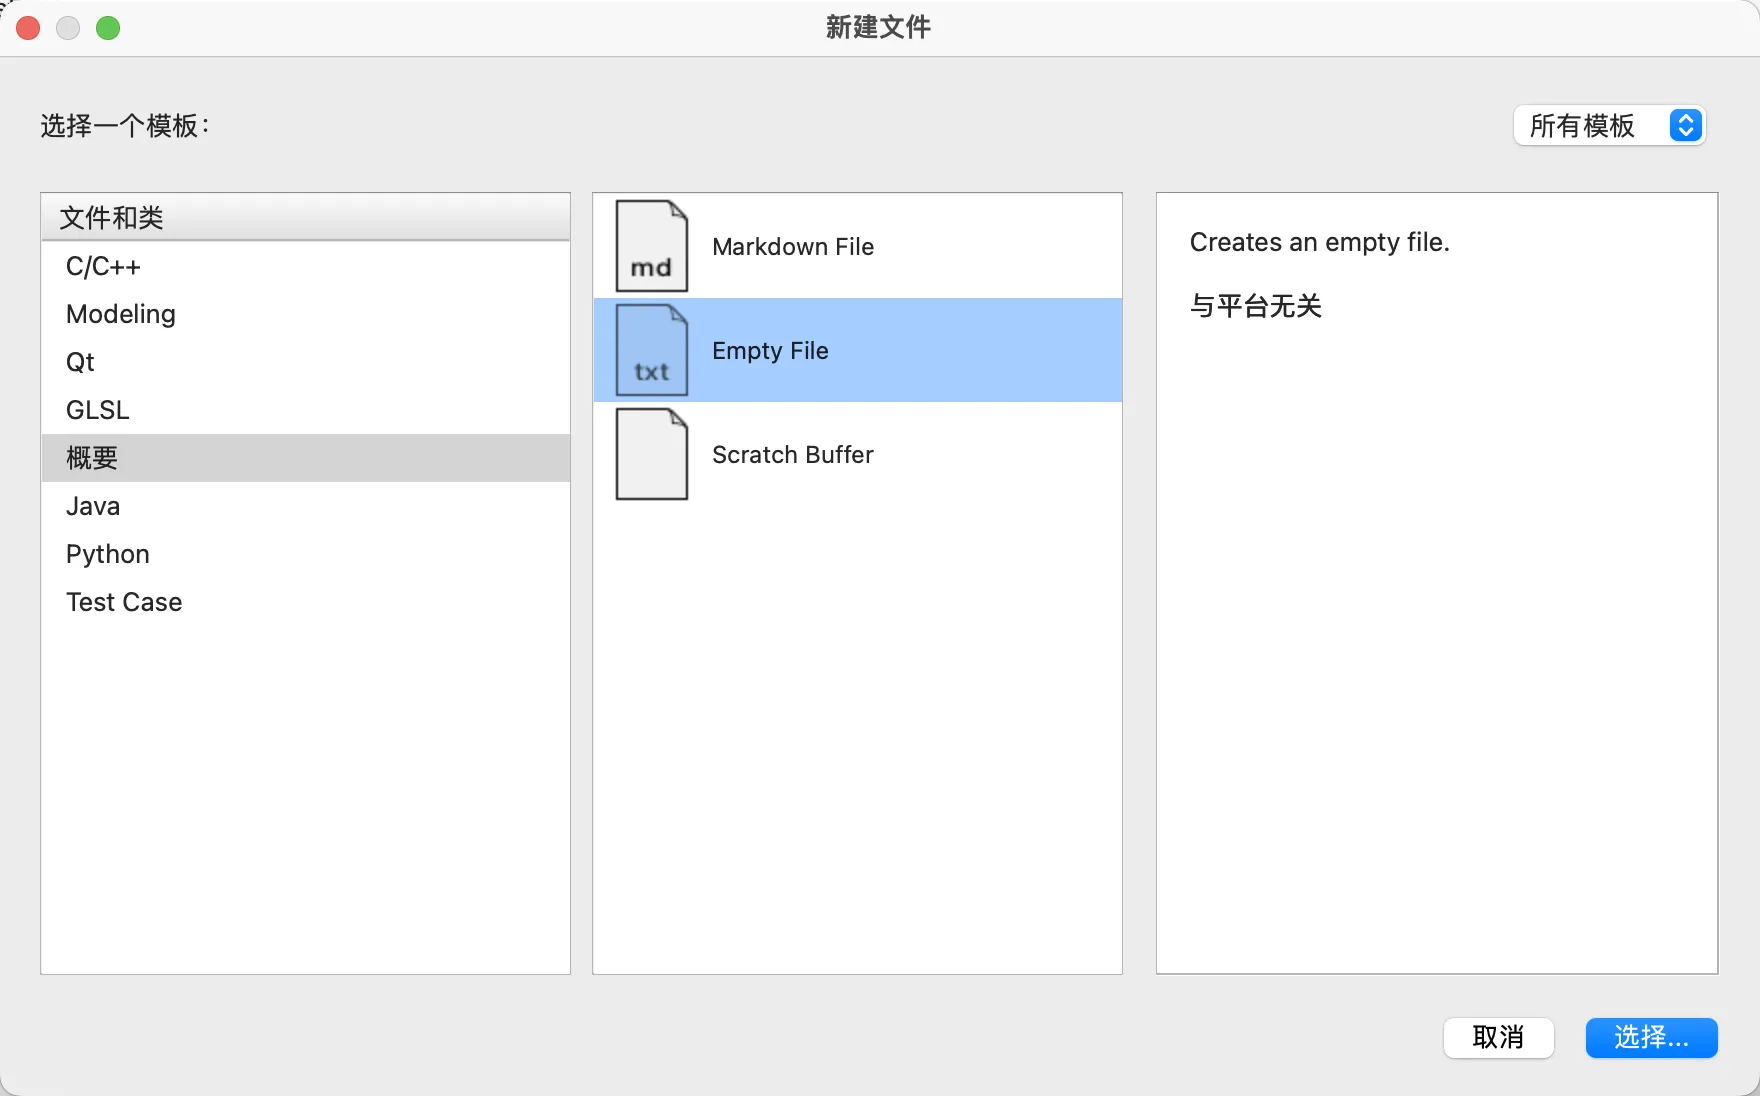
接下来,再创建一个新文件,暂且命名test.html,注意要添加到cmake的,文件管理器或者vim创建的需要修改CMakeLists.txt。
 注意检查CMakeLists.txt的qt_add_qml_module:
qt_add_qml_module(appQT-Vue
    URI QT-Vue
    VERSION 1.0
    QML_FILES
        Main.qml
        RESOURCES test.html
)
若出现 RESOURCES test.html则说明导入正确,没有则手动加入。
2.编写html代码
在test.html中写入
html<!DOCTYPE html>
<html lang="zh">
<head>
    <meta charset="UTF-8">
    <title>Login Page</title>
    <style>
        /* 添加一些基本的样式 */
        body {
            font-family: Arial, sans-serif;
            background-color: #f4f4f4;
        }
        form {
            background-color: #fff;
            padding: 20px;
            margin: 20px auto;
            max-width: 500px;
            box-shadow: 0 0 10px rgba(0, 0, 0, 0.2);
        }
        label {
            display: block;
            margin-bottom: 10px;
        }
        input[type="text"],
        input[type="password"] {
            display: block;
            width: 100%;
            padding: 10px;
            margin-bottom: 20px;
            border: 1px solid #ccc;
            border-radius: 4px;
            box-sizing: border-box;
        }
        button[type="submit"] {
            background-color: #4CAF50;
            color: #fff;
            padding: 10px 20px;
            border: none;
            border-radius: 4px;
            cursor: pointer;
        }
        button[type="submit"]:hover {
            background-color: #3e8e41;
        }
    </style>
</head>
<body>
    <form>
        <h1>Login</h1>
        <label for="username">用户名:</label>
        <input type="text" id="username" name="username">

        <label for="password">密码:</label>
        <input type="password" id="password" name="password">

        <button type="submit">登陆</button>
    </form>
</body>
</html>
3.修改Main.qml,加入webengineView,把url设置为test.html
c++import QtQuick 2.15
import QtWebEngine 1.15

Window {
    width: 640
    height: 480
    visible: true
    title: qsTr("Hello World")

    WebEngineView {
            id:webview
            z:100
            anchors.fill: parent
            url: Qt.resolvedUrl("test.html")
        }
}
4.编译运行项目,发现html内容可以顺利加载了
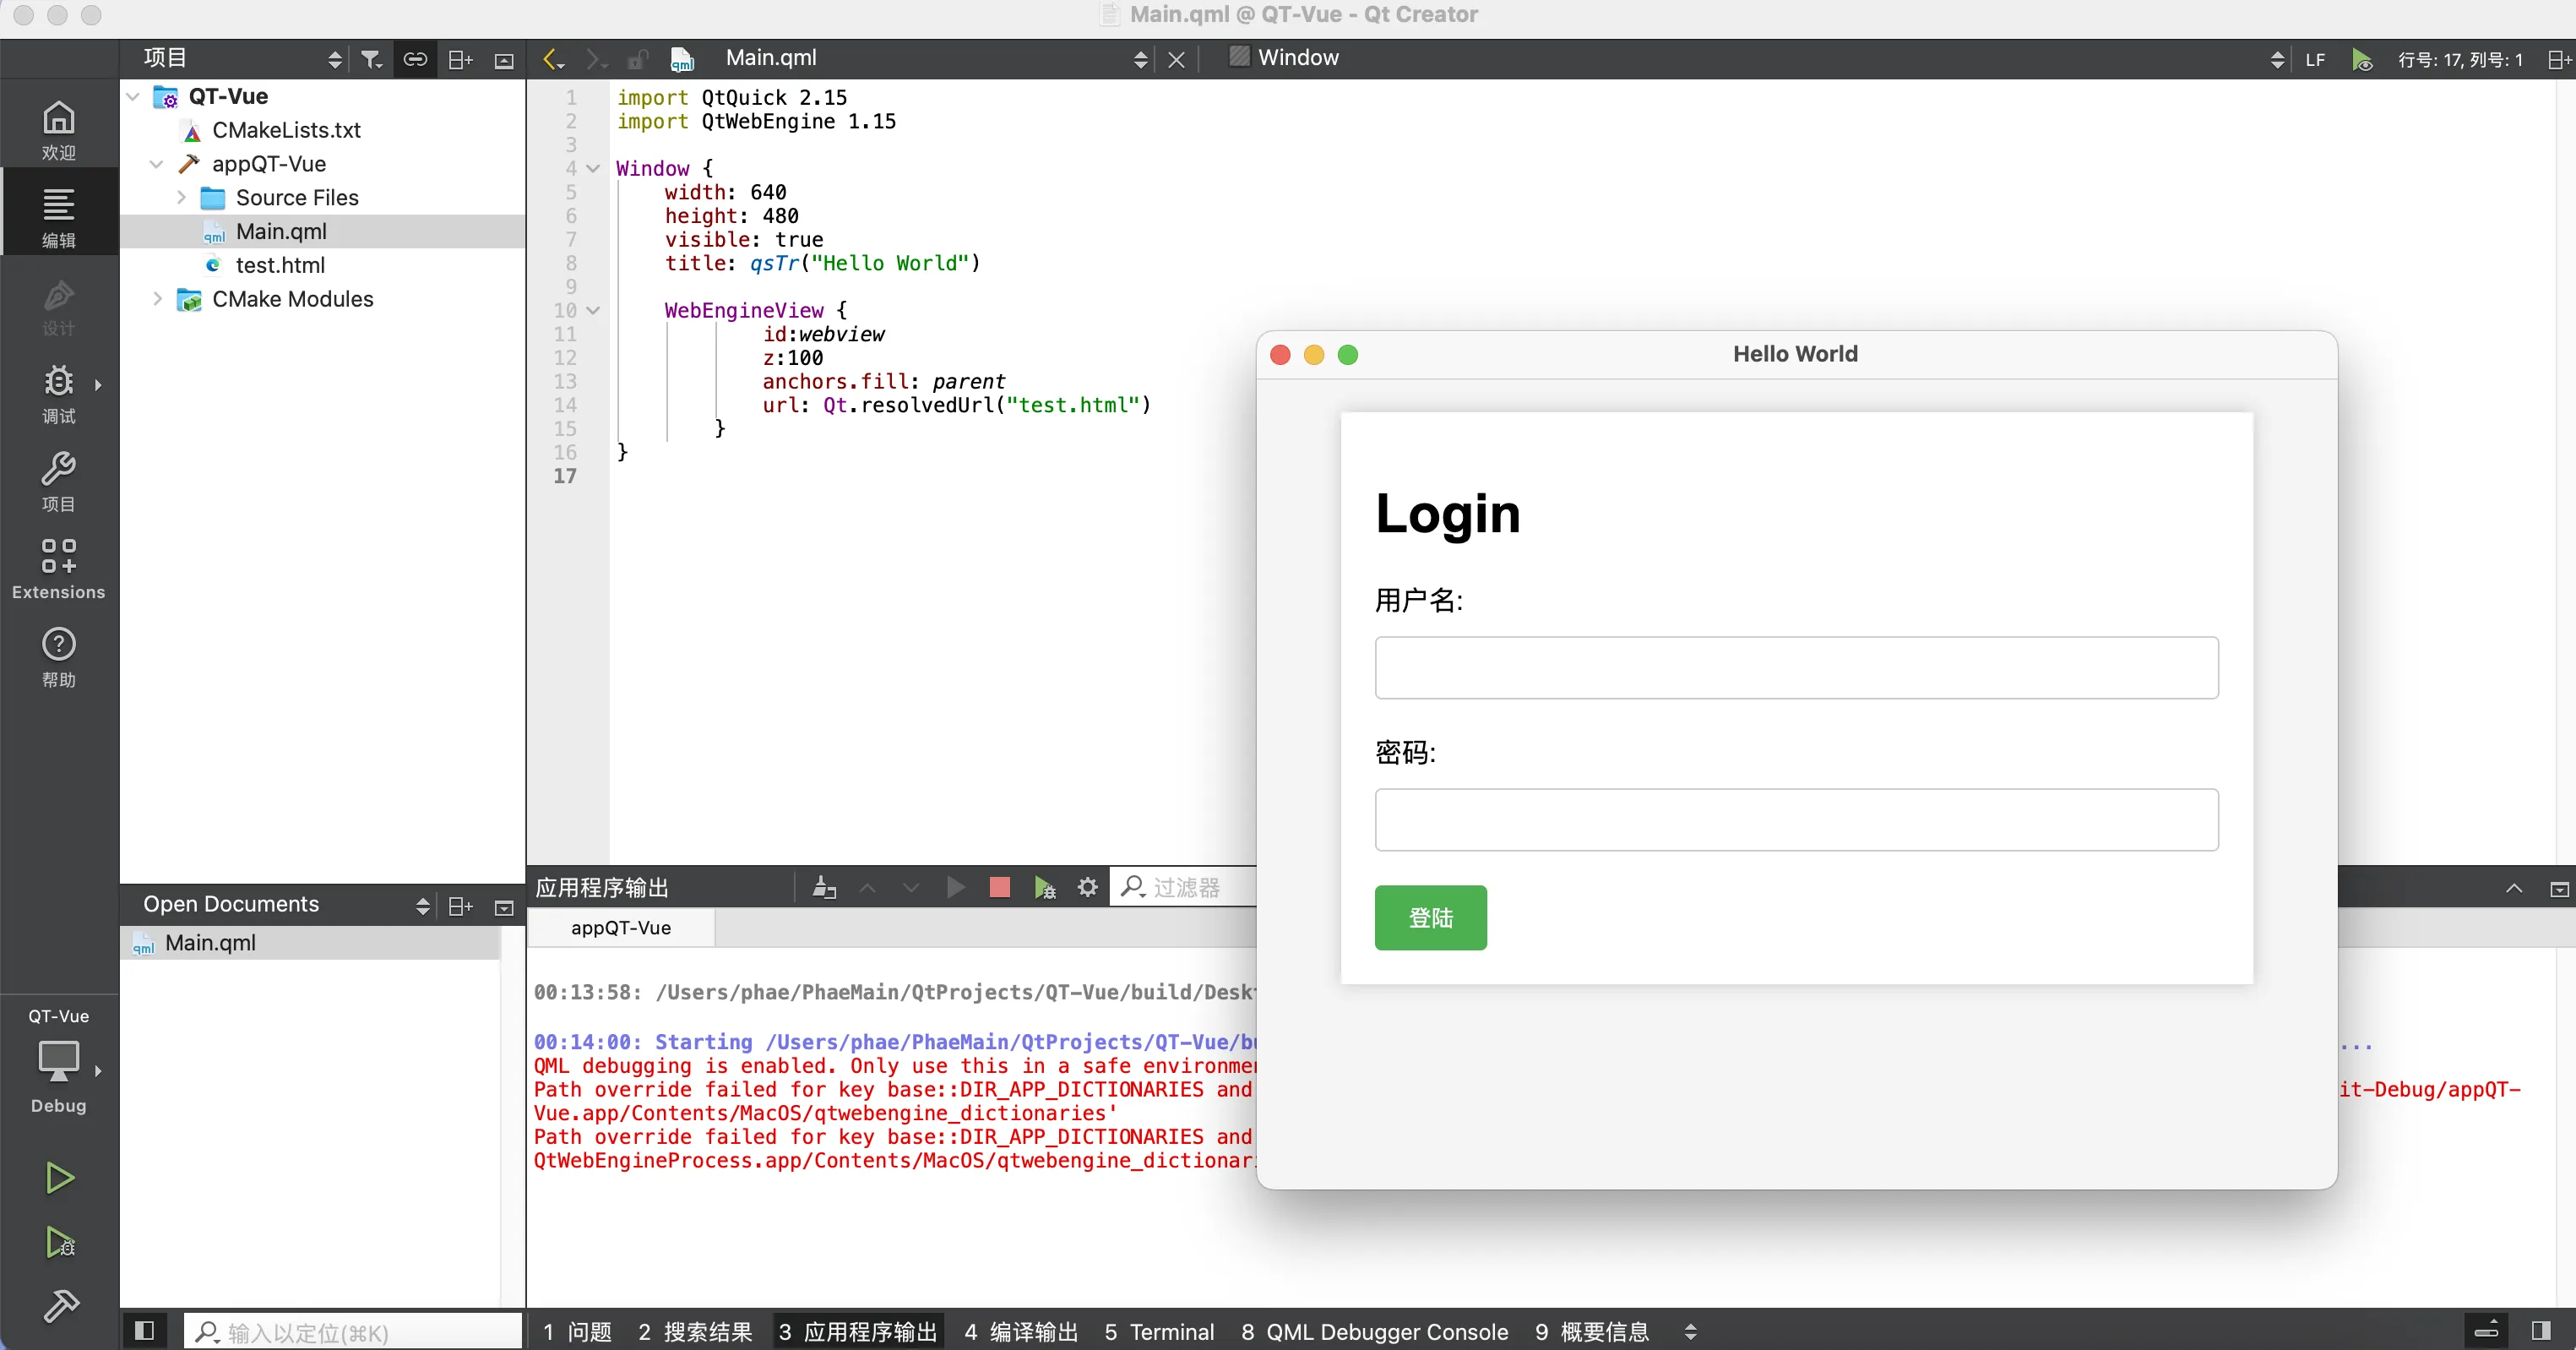
但是,数据交互还尚未实现,也就是C++和JS还没能互相通信呢。接下来可以通过qwebchannel.js搭桥,让C++和JS在QT中通信。想了解qwebchannel.js的具体实现可以看看: qwebchannel.js的源码地址 当然为了方便项目演示,直接把qwebchannel.js的源代码复制,然后在项目根目录新建一个qwebchannel.js粘贴源代码(注意需要加入cmake)。回到html文件中再head标签里面加入
html<script src="qwebchannel.js"></script>
这个时候CMakeLists.txt应该要有
qt_add_qml_module(appQT-Vue
    URI QT-Vue
    VERSION 1.0
    QML_FILES
        Main.qml
        RESOURCES test.html
        QML_FILES qwebchannel.js
)
就可以把它引入进来了。话不多说,接下来咱们让QML和HTML能顺利握手。
5.QML与HTML交互
接下来先修改test.html文件,监听接收QML的消息以及把表单数据发送QML。
html<!DOCTYPE html>
<html lang="zh">
<head>
    <meta charset="UTF-8">
    <title>登录页面</title>
    <style>
        /* 添加一些基本的样式 */
        body {
            font-family: Arial, sans-serif;
            background-color: #f4f4f4;
        }
        form {
            background-color: #fff;
            padding: 20px;
            margin: 20px auto;
            max-width: 500px;
            box-shadow: 0 0 10px rgba(0, 0, 0, 0.2);
        }
        label {
            display: block;
            margin-bottom: 10px;
        }
        input[type="text"],
        input[type="password"] {
            display: block;
            width: 100%;
            padding: 10px;
            margin-bottom: 20px;
            border: 1px solid #ccc;
            border-radius: 4px;
            box-sizing: border-box;
        }
        button[type="submit"] {
            background-color: #4CAF50;
            color: #fff;
            padding: 10px 20px;
            border: none;
            border-radius: 4px;
            cursor: pointer;
        }
        button[type="submit"]:hover {
            background-color: #3e8e41;
        }
    </style>

    <script src="qwebchannel.js"></script> <!-- 确保路径正确 -->
    <script>
        var qtJS;

        document.addEventListener("DOMContentLoaded", function() {
            new QWebChannel(qt.webChannelTransport, function(channel) {
                qtJS = channel.objects.QTJS;

                // 监听来自 QML 的验证结果
                qtJS.callhtml.connect(function(func, args) {
                    console.log("收到 callhtml 信号:", func, args);

                    if (func === "receiveValidationResult") {
                        // 根据验证结果进行处理
                        if (args === "验证成功") {
                            alert("登录成功!");
                        } else if (args === "验证失败") {
                            alert("用户名或密码错误!");
                        }
                    }
                });
            });
        });

        // 处理表单提交
        function handleFormSubmit(event) {
            event.preventDefault(); // 防止默认的表单提交行为

            // 获取表单数据
            var username = document.getElementById("username").value;
            var password = document.getElementById("password").value;

            // 将数据发送给 QML
            if (qtJS) {
                qtJS.receiveLoginData(username, password);
            }
        }

        // 绑定表单提交事件
        document.addEventListener("DOMContentLoaded", function() {
            var form = document.querySelector("form");
            form.addEventListener("submit", handleFormSubmit);
        });
    </script>
</head>
<body>
    <form>
        <h1>登录</h1>
        <label for="username">用户名:</label>
        <input type="text" id="username" name="username">

        <label for="password">密码:</label>
        <input type="password" id="password" name="password">

        <button type="submit">登录</button>
    </form>
</body>
</html>
然后再项目根目录新建一个 webChFunc.js(注意要加到cmake) 这时候的CMakeLists.txt应该是这样:
qt_add_qml_module(appQT-Vue
    URI QT-Vue
    VERSION 1.0
    QML_FILES
        Main.qml
        RESOURCES test.html
        QML_FILES qwebchannel.js
        QML_FILES webChFunc.js
)
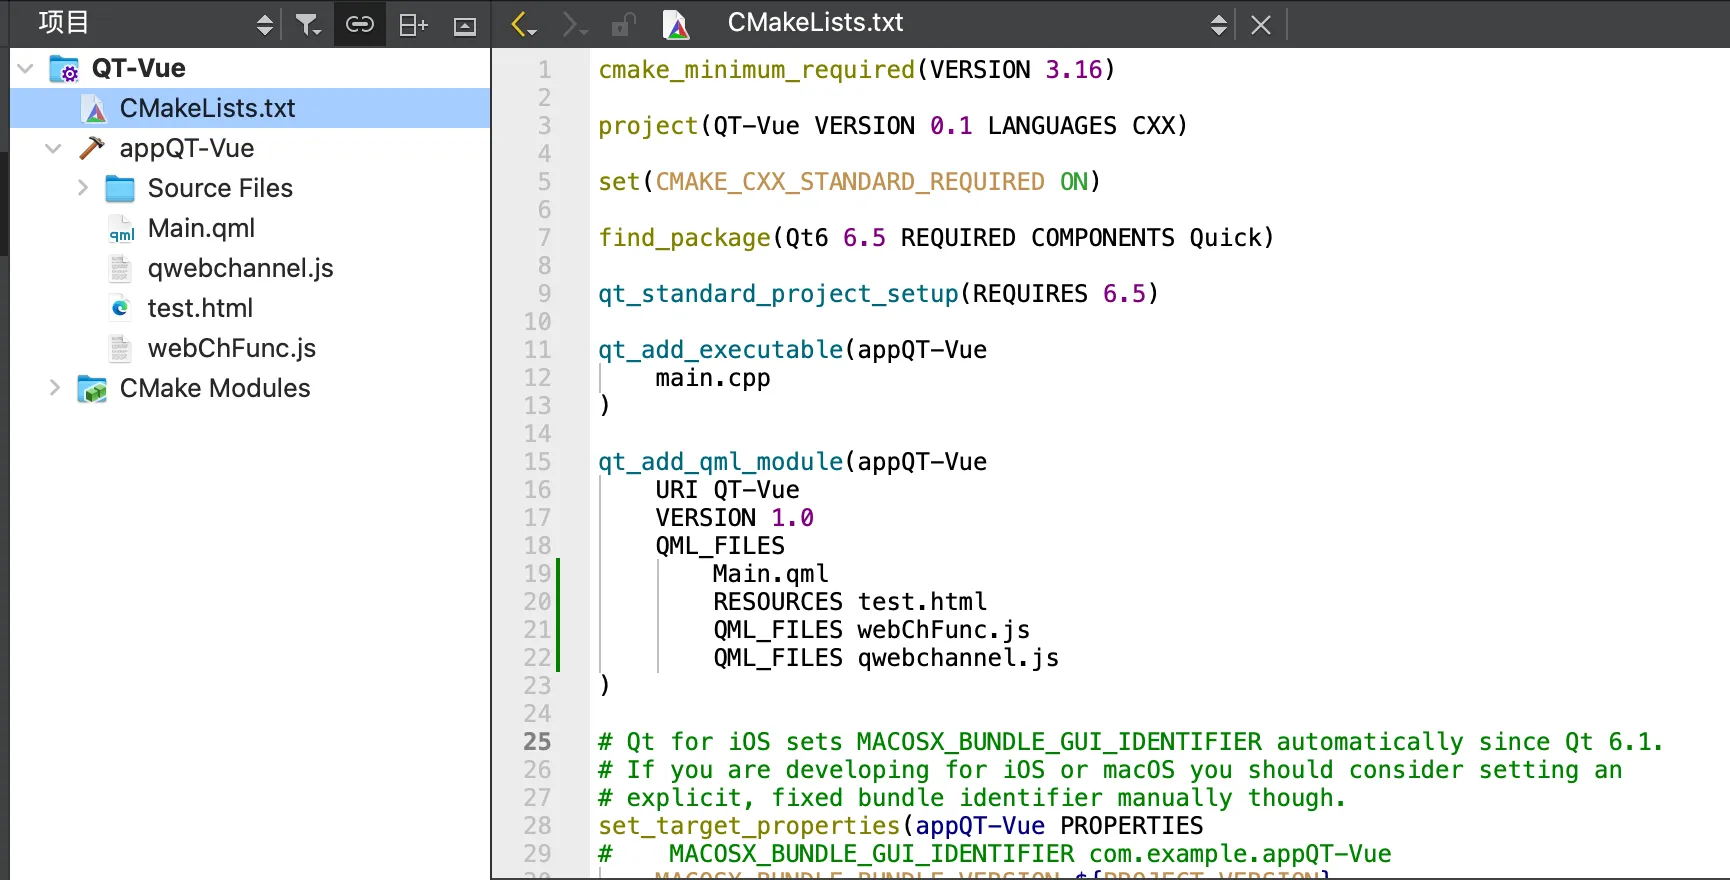 接下来修改webChFunc.js
JavaScript// webChFunc.js

// 定义一个对象,用于存放所有可供调用的函数
var nameToFunc = {
    exampleFunction: function(args) {
        console.log("exampleFunction 被调用,参数为:", args);
     },
    anotherFunction: function(args) {
        console.log("anotherFunction 被调用,参数为:", args);
     }
};

// 将 nameToFunc 对象暴露给 QML 使用
Qt.include("webChFunc.js");
最后再来修改Main.qml,接收JS传来的消息并把处理结果反馈回去
import QtQuick 2.15
import QtWebEngine 1.15
import QtWebChannel 1.15
import "webChFunc.js" as WebChFunc

Window {
    width: 640
    height: 480
    visible: true
    title: qsTr("登录示例")

    QtObject {
        id: qtJS
        WebChannel.id: "QTJS"

        // 信号:从 QML 调用 HTML 的函数
        signal callhtml(string func, string args)

        // 函数:从 HTML 调用,用于路由消息到相应的 QML 函数
        function callqml(func, args) {
            if (WebChFunc.nameToFunc[func]) {
                WebChFunc.nameToFunc[func](args);
            } else {
                console.warn("没有注册名为", func, "的函数。");
            }
        }

        // 函数:向 JavaScript 发送信号
        function sendSignalToJS(result) {
            callhtml("receiveValidationResult", result);
        }

        // 暴露给 JavaScript 调用的函数,用于接收来自 JS 的消息
        function receiveFromJS(message) {
            console.log("收到来自 JS 的消息:", message);
            // 你可以在这里基于接收到的消息调用某些 QML 函数或发出信号
        }

        // 接收来自 HTML 的登录数据
        function receiveLoginData(username, password) {
            console.log("收到登录数据 - 用户名:", username, "密码:", password);
            // 验证用户名和密码
            if (username === "admin" && password === "admin") {
                sendSignalToJS("验证成功");
            } else {
                sendSignalToJS("验证失败");
            }
        }
    }

    WebChannel {
        id: webch
        registeredObjects: [qtJS]
    }

    WebEngineView {
        id: webview
        anchors.fill: parent
        webChannel: webch
        url: Qt.resolvedUrl("test.html")
    }
}
编译运行,不出意外,这个时候QML和HTML应该是握手成功了。 让咱们来看看效果,直接点击登录按钮,这个时候JS发送空账号和密码到QML,QML处理后把结果发回来到JS。
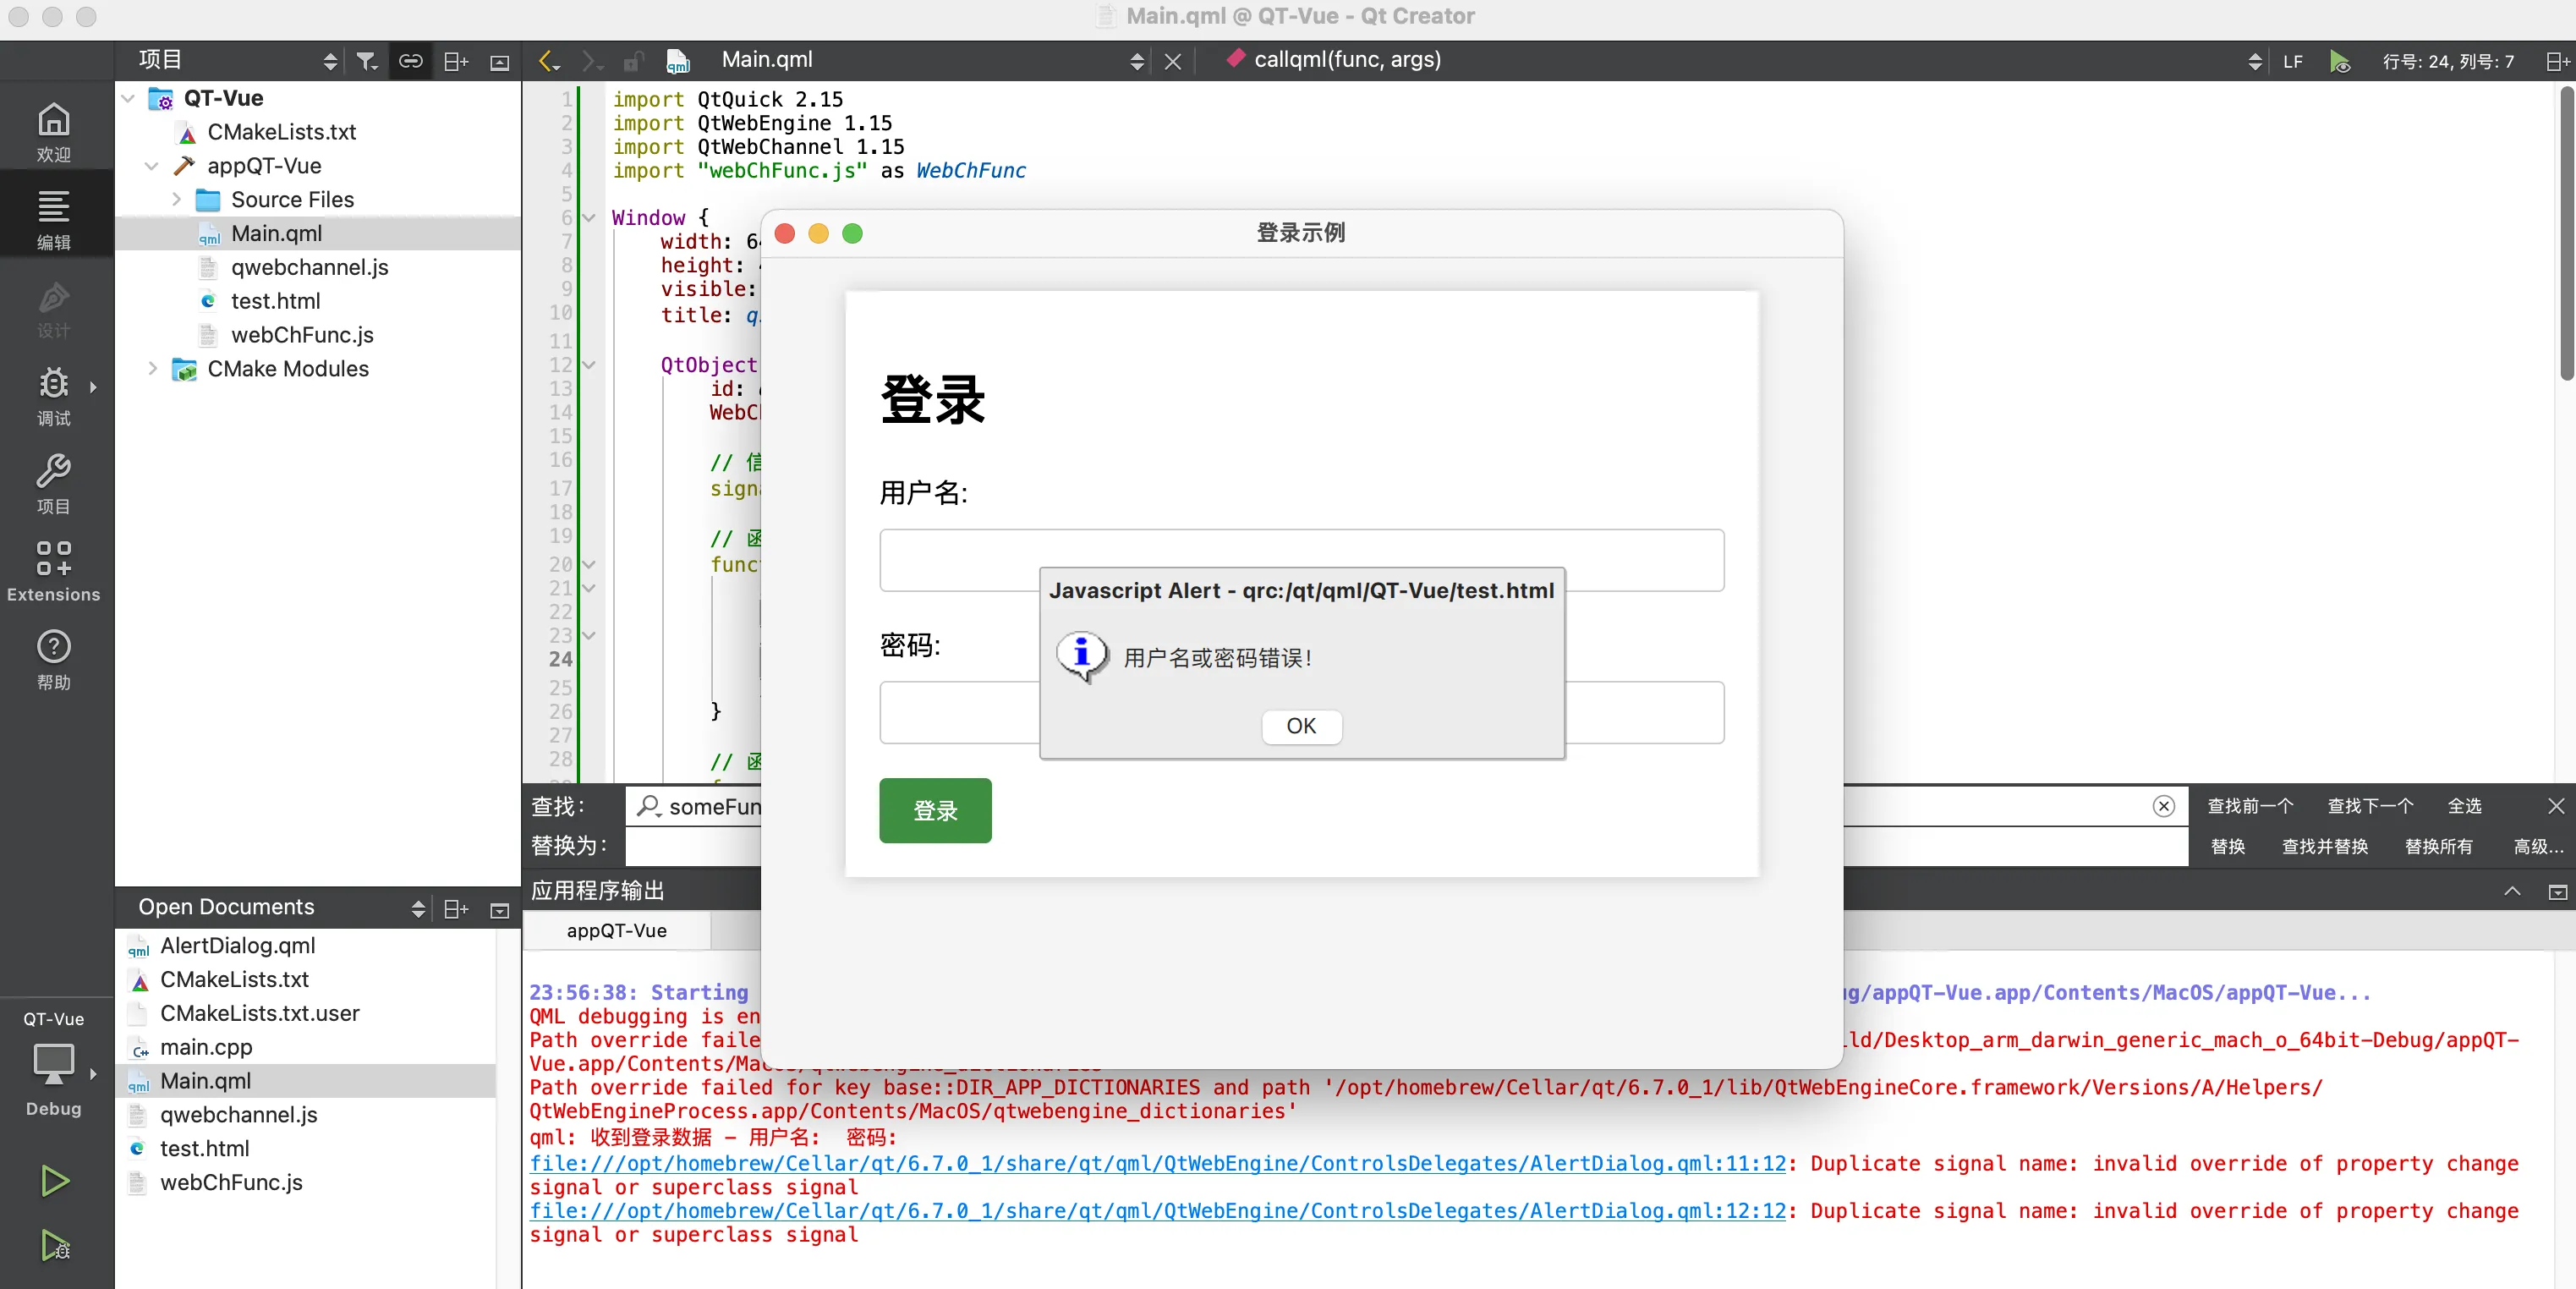
在QML中设定的账号和密码都是admin,继续来输入看看结果。
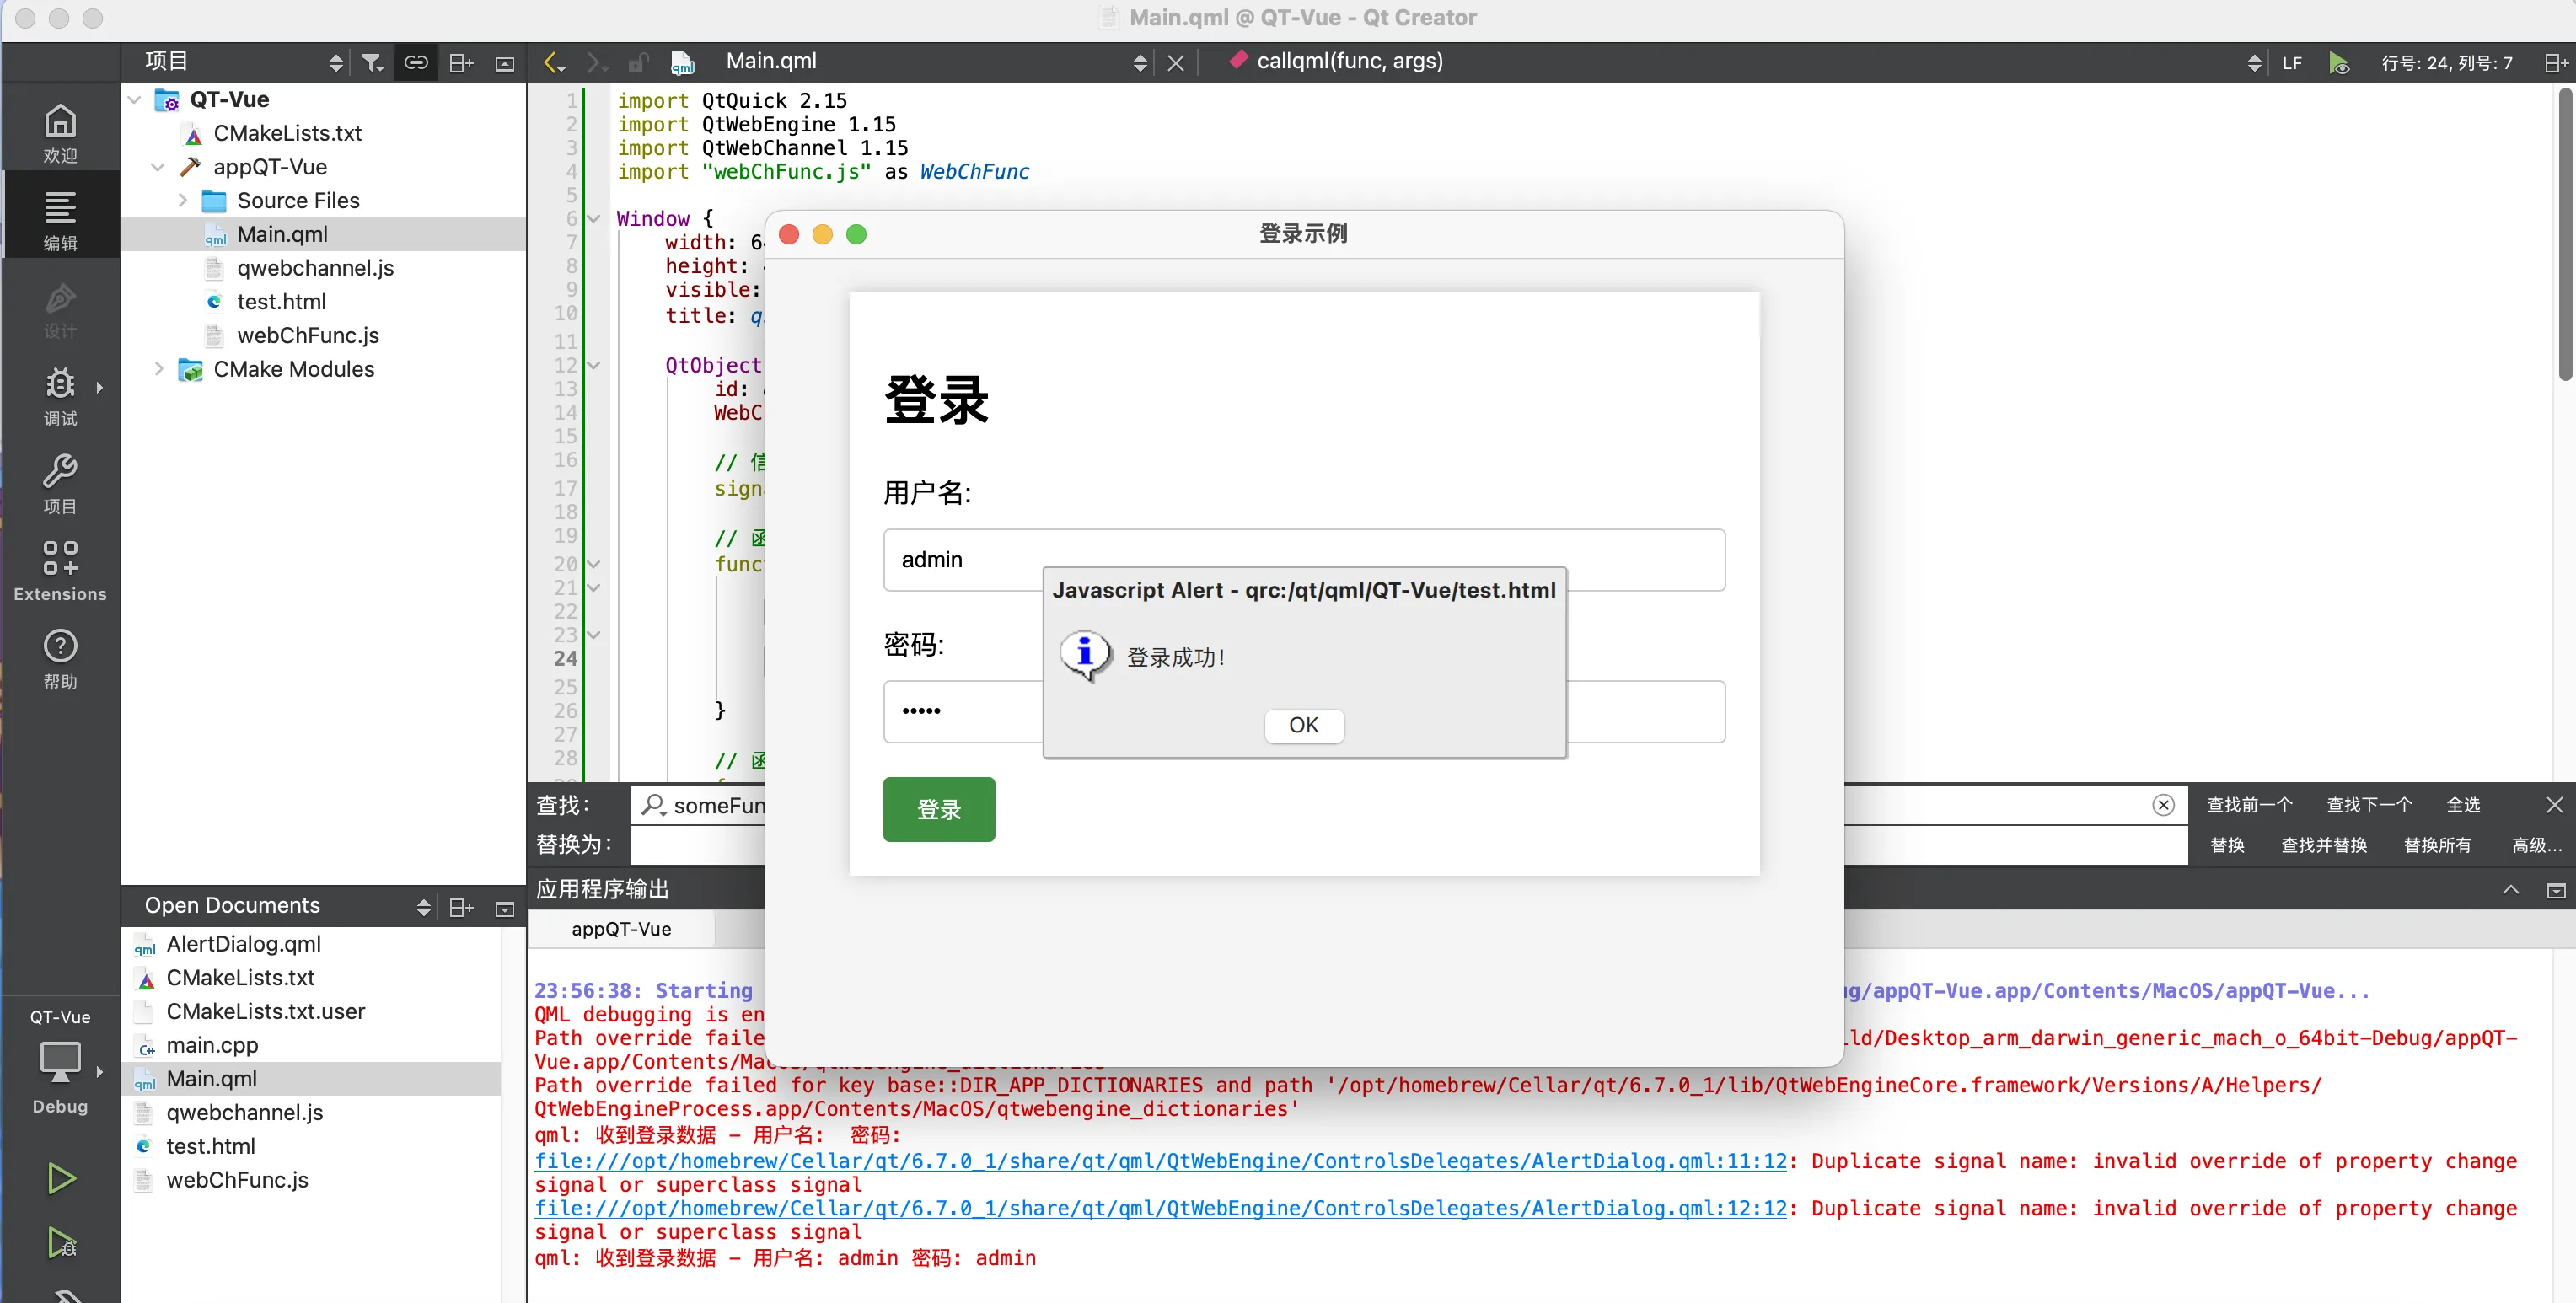
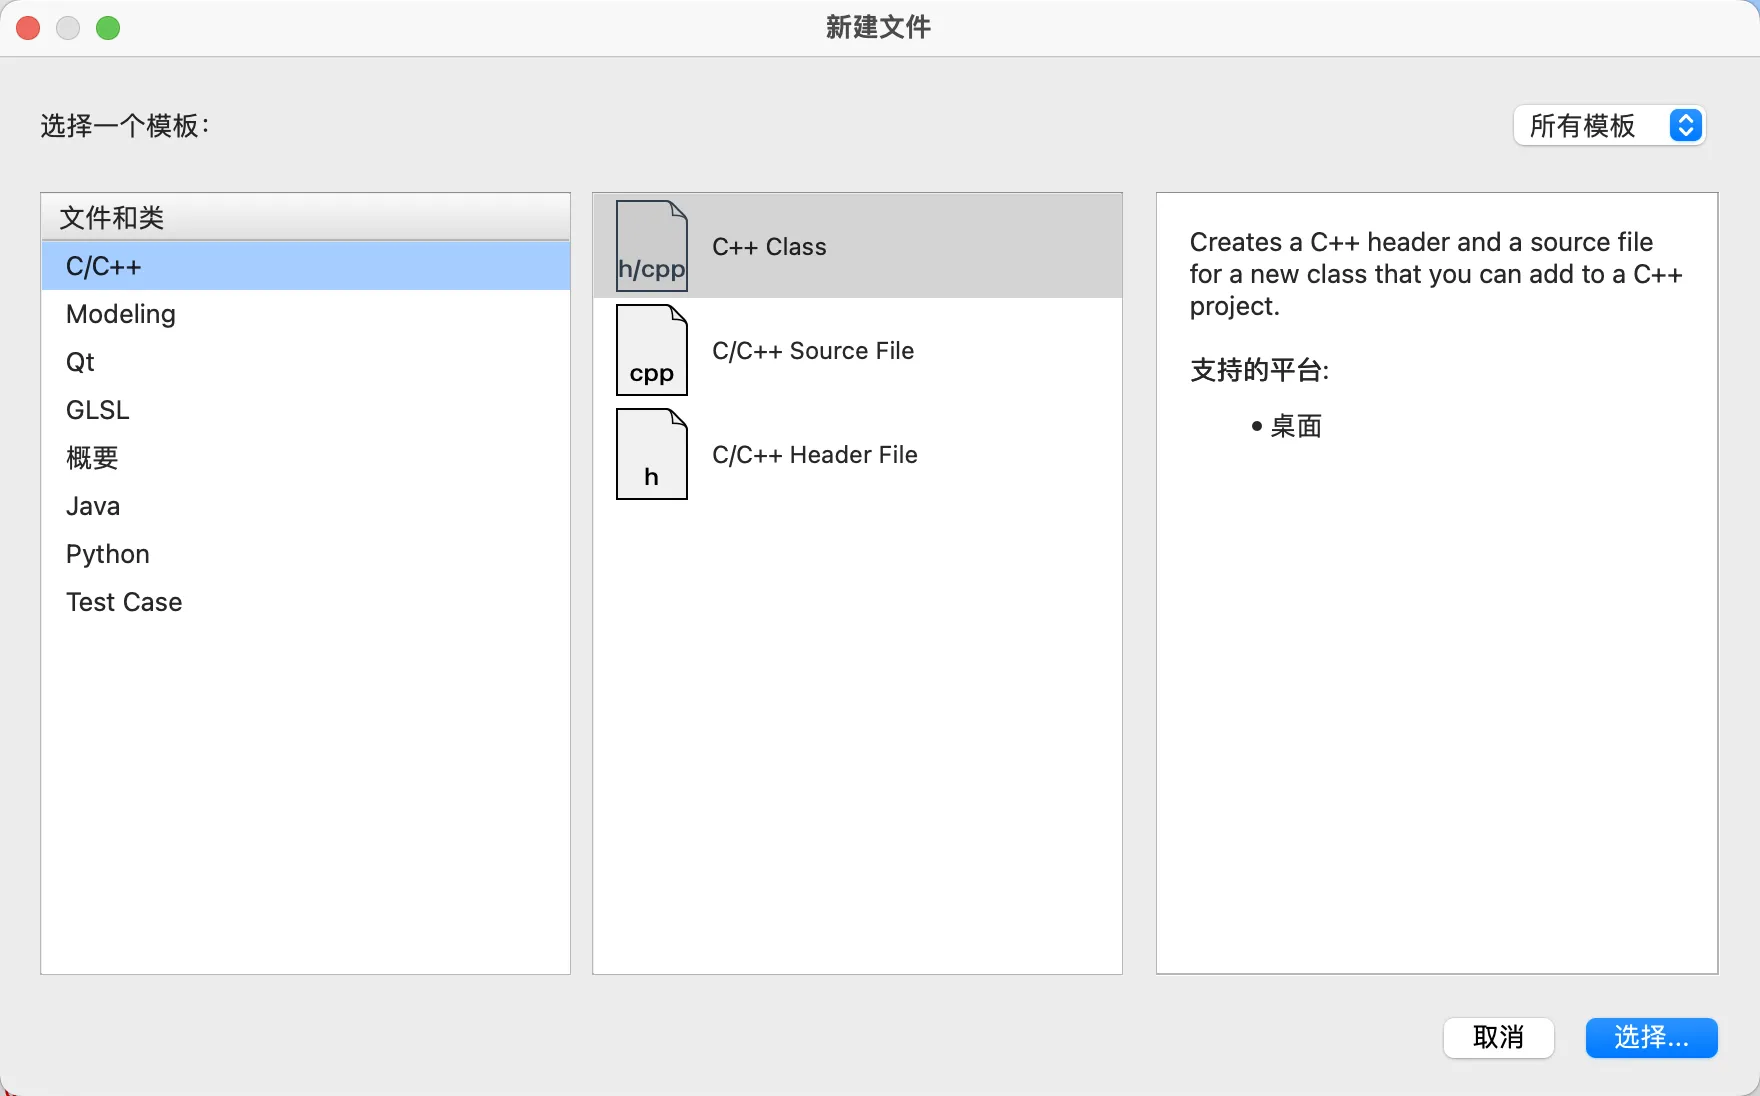
一切按照咱们想象的方向发展。 当然,逻辑处理应该放到C++代码来处理而不QML中,让咱们继续来完善一下。 首先创建一个 C++ 类 Authenticator 处理登录逻辑:
接着修改authenticator.h文件
C++#ifndef AUTHENTICATOR_H
#define AUTHENTICATOR_H

#include <QObject>

class Authenticator : public QObject
{
    Q_OBJECT
public:
    explicit Authenticator(QObject *parent = nullptr);

    // QML中可调用的方法,用于接收登录数据
    Q_INVOKABLE void verifyLogin(const QString &username, const QString &password);

signals:
    // 信号:发送验证结果给JS
    void validationResult(const QString &result);

private:
    bool isValidCredentials(const QString &username, const QString &password);
};

#endif // AUTHENTICATOR_H
修改authenticator.cpp文件
C++#include "Authenticator.h"
#include <QDebug>

Authenticator::Authenticator(QObject *parent) : QObject(parent)
{
}

void Authenticator::verifyLogin(const QString &username, const QString &password)
{
    qDebug() << "Authenticator对象收到登录数据 - 用户名:" << username << "密码:" << password;
    // 验证用户名和密码
    if (isValidCredentials(username, password)) {
        qDebug() << "验证成功,发送消息到QML";
        emit validationResult("验证成功");
    } else {
        qDebug() << "验证失败,发送消息到QML";
        emit validationResult("验证失败");
    }
}

bool Authenticator::isValidCredentials(const QString &username, const QString &password)
{
    // 简单的用户名密码验证逻辑
    return (username == "admin" && password == "admin");
}
修改main.cpp
C++#include <QGuiApplication>
#include <QQmlApplicationEngine>
#include <QQmlContext>
#include "Authenticator.h"

int main(int argc, char *argv[])
{
    QGuiApplication app(argc, argv);

    QQmlApplicationEngine engine;

    // 创建 Authenticator 实例
    Authenticator authenticator;

    // 将 Authenticator 对象注册为 QML 上下文属性
    engine.rootContext()->setContextProperty("authenticator", &authenticator);

    QObject::connect(
        &engine,
        &QQmlApplicationEngine::objectCreationFailed,
        &app,
        []() { QCoreApplication::exit(-1); },
        Qt::QueuedConnection);

    engine.loadFromModule("QT-Vue", "Main");

    return app.exec();
}
最后再来修改Main.qml文件
import QtQuick 2.15
import QtWebEngine 1.15
import QtWebChannel 1.15
import "webChFunc.js" as WebChFunc

Window {
    width: 640
    height: 480
    visible: true
    title: qsTr("登录示例")

    QtObject {
        id: qtJS
        WebChannel.id: "QTJS"

        // 信号:从 QML 调用 HTML 的函数
        signal callhtml(string func, string args)

        // 函数:从 HTML 调用,用于路由消息到相应的 QML 函数
        function callqml(func, args) {
            if (WebChFunc.nameToFunc[func]) {
                WebChFunc.nameToFunc[func](args);
            } else {
                console.warn("没有注册名为", func, "的函数。");
            }
        }

        // 函数:向 JavaScript 发送信号
        function sendSignalToJS(result) {
            callhtml("receiveValidationResult", result);
        }

        // 暴露给 JavaScript 调用的函数,用于接收来自 JS 的消息
        function receiveFromJS(message) {
            console.log("收到来自 JS 的消息:", message);
            // 你可以在这里基于接收到的消息调用某些 QML 函数或发出信号
        }

        // 接收来自 HTML 的登录数据
        function receiveLoginData(username, password) {
            console.log("收到登录数据 - 用户名:", username, "密码:", password,"调用C++的验证函数");
             // 调用 C++ 的验证函数
            authenticator.verifyLogin(username, password);
        }
    }

    WebChannel {
        id: webch
        registeredObjects: [qtJS]
    }

    WebEngineView {
        id: webview
        anchors.fill: parent
        webChannel: webch
        url: Qt.resolvedUrl("test.html")
    }

    Component.onCompleted: {
        // 连接 C++ 信号到 QML 信号
        // authenticator.validationResult.connect(qtJS.sendSignalToJS)
        authenticator.validationResult.connect(logOut.logout)

    }
    QtObject {
        id: logOut

         function logout(data){
             console.log("接收到消息:",data,"调用sendSignalToJS函数")
             qtJS.sendSignalToJS(data)
         }
    }
}
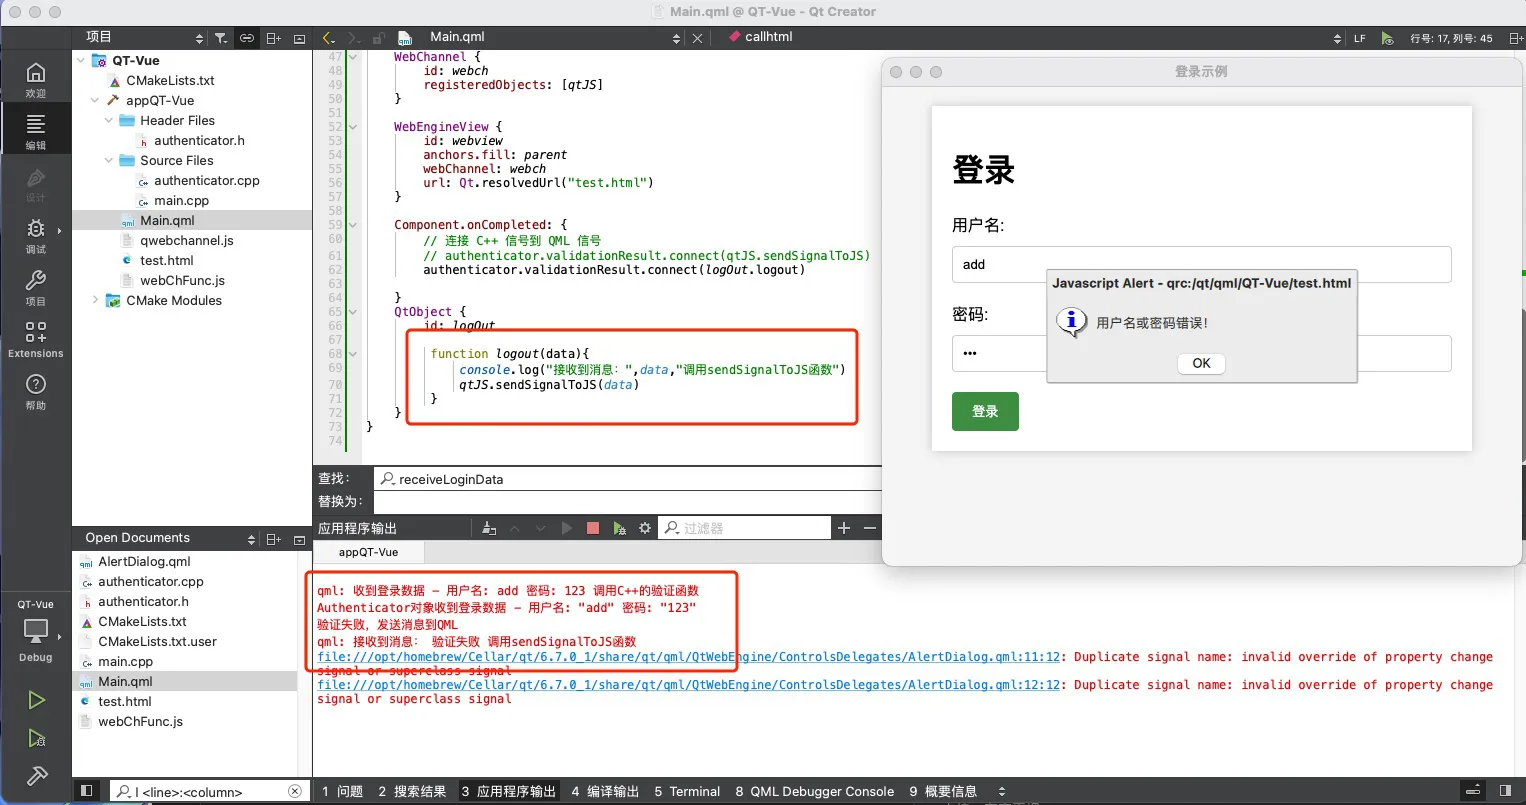
重新编译运行,看到log输出QML与C++连接起来了。
QT融合Vue
占坑,有空再埋。
本文作者:phae
本文链接:
版权声明:本博客所有文章除特别声明外,均采用 BY-NC-SA 许可协议。转载请注明出处!